Scripts
Scripts are the way in which GameMaker: Studio permits you to design your own functions.
You can use code in a number of places within GameMaker: Studio, from objects, to rooms and instances, and there are a number of built in functions that make your life easier when programming,
however it is often necessary for you to create your own functions to do a specific task, or to condense a large section of code into a more manageable chunk, or even to be able to re-use a particular
code block in many different places. That is why GameMaker: Studio gives you the ability to create scripts.
What Is A Script?
Scripts are written using GML (the Game Maker Language, covered in the Reference section), which is the built-in programming
language that GameMaker: Studio uses. Once you become more familiar with GameMaker: Studio and want to use it to its fullest extent, it is advisable to start learning to use this language, as it
greatly expands your possibilities when creating games.
A script (like any built-in function) can take different input variables, with real, string, boolean and special values like all or noone being accepted, and these input variables are generally called
arguments, although they are also referred to as parameters. To execute a script from an object or a time line you can use the Execute
Script action , but you can also call it in a code box using the actual script name as if it were a function or even by using the GML function
script_execute. If you use the script action you can specify the script you want to execute, together with the up to five arguments, but if you are using the code editor to call a script, you can pass up to sixteen
arguments.
Using Scripts
As mentioned above, you can pass a number of arguments to a script, and it will use these to perform the task you have written it for. To understand this better, take, for example, an action (or a code in GML) and think
about how it works... you place it in an event and specify a number of parameters and it will make your instance do something. Scripts are exactly the same, with the only difference being that you write them! Not only
can you pass arguments into a script, but you can also ask a script to return a value too (using the return keyword), so you can use them to build calculating methods (mathematical methods) or give
back an instance id after a complex collision detection or any number of things. Please note, however, that using return effectively ends the script, and so no code after it has been used will be executed,
and this means that a certain amount of thought has to go into how your scripts are structured.
Saving and Loading Scripts
You can save and load scripts from *.txt files into GameMaker: Studio and in this way you can create collections of scripts and store them for use in multiple projects. To load a script (or
a collection of scripts) into GameMaker: Studio, simply right-click on the scripts resource folder (or any sub-folder that you have created in that section) and select Add Existing Script. This
will open the file browser and you can select either a script *.gmx, or a *.txt file. They will then be loaded in to GameMaker: Studio.
For saving scripts it's a similar process, where you right-click on a script (or a script folder) and select Export Selected Script. This will open up a window asking you where to export to, and when you
click on "Okay", the script will be saved as a *.txt file, with the name of the file being the same as the name of the script. If you have selected multiple scripts in a folder, they will all be saved, each with the
name of the script they correspond to.
Creating A Script
To create a script in your game, choose Create Script from the Resources menu, or right click on the scripts resource in the resource tree and select Create Script, or just click the create script
button on the toolbar at the top of the main GameMaker: Studio screen. Whatever method you choose will open the following window:
 Note: The script editor window and the code editor window for objects have exactly the same functionality. The only difference between them is that the script editor has a name box whereas the
code editor has the choice of which instance is to run the code (self, other or object), just like the D'n'D actions.
Note: The script editor window and the code editor window for objects have exactly the same functionality. The only difference between them is that the script editor has a name box whereas the
code editor has the choice of which instance is to run the code (self, other or object), just like the D'n'D actions.
The Script Editor
When you open the script editor, you should first give your new script a name. This should be something sensible and easy to remember and recognise, and must not start with a number or have any symbols (except
the under-bar "_" symbol). The name you give the script is the one you will use later as a function in code. It is also a good idea to write some comments at the start of the script (see the above image) to outline the script
arguments and how it should be used, especially if you are going to work as part of a team, or plan on using many scripts in your game.
Once you have done that you can start to write your script using standard GML functions and variables, using the many options along the Toolbar at the top to help you in this process. Here is a brief explanation of what each of
the toolbar buttons does:
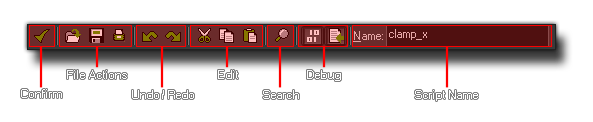
Confirm
This will close the script editor and save any changes you have made. Be aware that there are no confirmation messages asking if you want to save.
Load A Script From A File
This will open the standard window for loading a script that has previously been saved as a text file. This will replace the existing script with the loaded one.
Save Script
This will save your current script as a *.txt file, ready to be used in another game.
Print Script
This will open a standard windows dialogue where you can select a printer and print out your current script on paper.
Undo
This will undo the last action, and you can repeatedly undo consecutive actions with this button, but note that the number of undos that can be performed is limited to 16.
Redo
If you have used the undo function, you can use this to go back to the state that you undid. This is limited to the number of undos that you have done previously.
Cut
You can use this to "cut" a section of your code out of the script. This code is stored to the clipboard and can then be pasted into another part of the same script, another script resource or even into some
other program, independent of GameMaker: Studio.
Copy
This button will copy the currently selected code into the clipboard for use in another place, either the same script, another script or even an alternate program.
Paste
You can use this button to paste whatever text you have previously stored in the clipboard (with cut, or copy) into the current script.
Search And Replace
Clicking this button will open the search/find and replace tab in the script editor. See below for more details.
Check Syntax
This button will toggle on and off the syntax checker of the script editor. When on, any errors in the code syntax will be highlighted in red (default) and a message will be displayed at the bottom of the editor
explaining briefly what the problem is. Note that not all aspects can be tested at this stage but the syntax of your script will be tested, together with the existence of functions used.
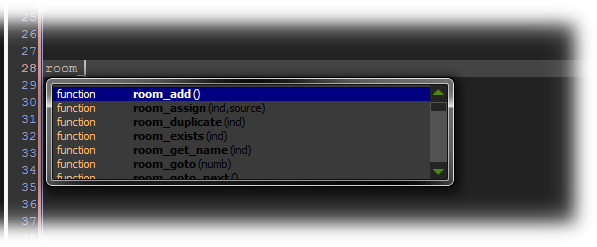
Auto Complete
When this is switched on, if you pause when typing something an auto-complete window will pop up and you can then use the cursor keys or mouse to navigate to the function that you are looking for. The image
below illustrates this:
Keyboard Shortcuts
There are a number of keyboard shortcuts to help you navigate around the script editor, and each one is designed to help you get the most from this powerful tool:
- By pressing f2 you get the code snippet pop-up, which permits you to select one of the commonly used code methods. You can define your own code snippets if you want to, saving them
to the Local App Data directory (ie: C:\Users\MyUserName\AppData\Local\GameMaker-Studio) for future use using the name "snippets.txt". If there are no snippets defined then GameMaker: Studio
will copy the defaults from the Roaming directory (ie: C:\Users\MyUserName\AppData\Roaming\GameMaker-Studio). You can edit this file with any text editor, and each snippet is on a separate line (there
should be no blank lines). It starts with the name of the snippet (which is what is shown in the menu) followed by the colon (:) followed by the actual snippet of code. Use # for a newline and put the text that
needs to be selected first between | symbols. See the examples that are already in the file in the Roaming directory to see how it is set up, and it is strongly recommended that you make a backup of it before you
start changing anything, although the base file will be re-installed when you update GameMaker: Studio (but the Local App Data version will remain).
- You can use f7 and f8 to change the size of the font within the editor.
- If you press f10 you can toggle on or off the colour coding for your code.
- Press <CTRL> + F to call up the search, find and replace options (see below).
- If you are using multiple scripts, then you can press f12 (or click the Middle Mouse Button) when the mouse is over any of the other script names to have it opened in a new window, ready for editing. If no script is selected, then
the manual will be opened.
- You can press <Shift> + f12 (or <Shift> and the Middle Mouse Button) when the mouse is over any selected text to have it open the
Search In Scripts window, already populated with the selected text. You can also do this on a function
(without selecting it) and the function will be used to populate the search feild of the window.
- You can use <Ctrl> + Z for undo and <Ctrl> + <Shift> + Z for redo.
- The arrow keys move you around in the text, and you can use <Ctrl> with the left and right arrow key to move to the beginning of the previous or next word. If you use
<Ctrl> with the up and down arrows you also scroll the text.
- You can hold the <Shift> key and move with the arrow keys to select text.
- The <Home> key moves the cursor to the beginning of the line and the <End> key to the end of the line, and if you also hold <Ctrl> they move to the start
and end of the script. Holding the <Shift> key you can select the text too.
- Use <TAB> to indent selected lines and <Shift> + <TAB> to unindent selected lines.
- Hold <Ctrl> with the <Backspace> or <Delete> key to delete until the beginning of the previous or next word.
- You can force the auto-complete window to appear if you have it switched off in the Scripts Preferences by pressing
<Ctrl> + <Space>, and you can cancel it at anytime by pressing <ESC>.
- You can drag a selection with the mouse. (Use <Ctrl> to copy it.) The new location is immediately shown.
- You can scroll through the text with the mouse wheel and with <Ctrl> pressed the cursor scrolls with the text. As with previous shortcuts, holding the <Shift> key selects
text.
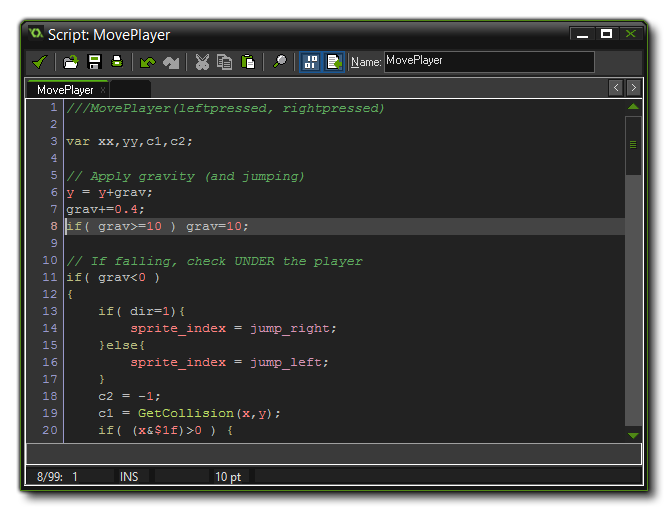
Adding Comments and Naming Code Blocks
Commenting your code is very important for maintaining productivity as it keeps things clear and separates sections of code in such a way that it is obvious what each part does and why it is there. It also means that if
you are working in a team then you can leave notes for other members and that they will know exactly what you have done or what a specific section of code is for. Even if you are a solo developer, leaving comments
for your code is important, especially if you have to leave the project and come back to it at a later date.
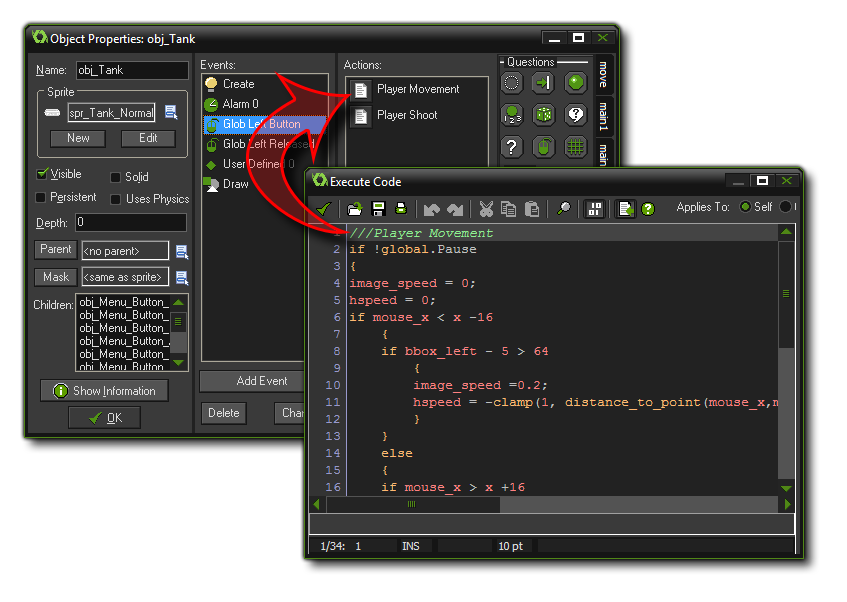
Commenting your code is simple, as you just have to use "//" before any line of text or you can comment out whole paragraphs by using "/* text here */". The following image illustrates a
script using both these methods:
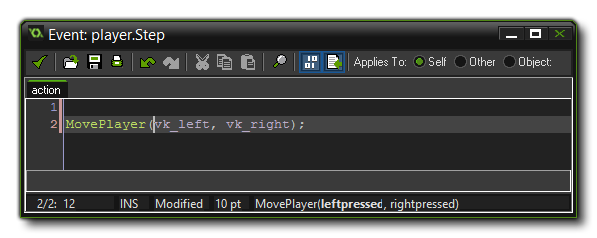
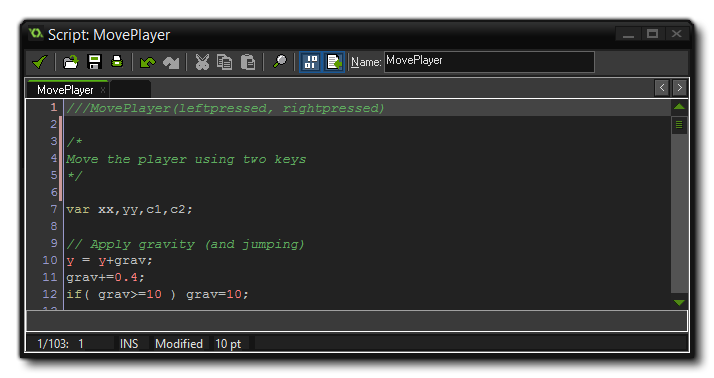 If you are in the code editor, then you can also give your code box a title by making a comment for the first line using the following format:
///Your Comment Here!
This comment will then be used for the "name" of that codebox (this works for codeboxes added to Timelines too) as illustrated by the following image:
 If you use make a comment in this way in the script editor, then the comment text will be used as the auto-complete text in the code editor when you type the script. So, in the example script image above
above we have the script "MovePlayer", and it starts with a "///" comment, which would then show in the code editor like this:
If you use make a comment in this way in the script editor, then the comment text will be used as the auto-complete text in the code editor when you type the script. So, in the example script image above
above we have the script "MovePlayer", and it starts with a "///" comment, which would then show in the code editor like this:
Script Tabs
When creating larger games, you will often require many, many scripts and this can cause a certain amount of "clutter" in the resource tree, and it can be hard to keep track or organise the scripts in a coherent
fashion. To help with this, the Script Editor has child scripts available to you in the form of tabs. So, say you have a player object with a create script, a movement script, a collision script and a draw script.
Instead of placing them all in the resource tree, you would have a parent script, with its name being the one shown in the resource tree, and various child scripts. These child scripts are no
different to any other scripts in your game, and will work as they should. However they will not appear in the resource tree, and to access them you must first open the parent script.
 To create a new child script you simply click on the empty tab that is always to the right of the current tab (if you can't see this, then try scrolling the rest of the tabs using the arrows in the top right corner). This will
create the new script which you should name, and it will be stored within the parent script when you close and save the script editor. You can also delete these scripts easily by clicking on the "cross" icon that you can
see on all the script tabs.
To create a new child script you simply click on the empty tab that is always to the right of the current tab (if you can't see this, then try scrolling the rest of the tabs using the arrows in the top right corner). This will
create the new script which you should name, and it will be stored within the parent script when you close and save the script editor. You can also delete these scripts easily by clicking on the "cross" icon that you can
see on all the script tabs.
Colour Coding
As you might have noticed, parts of the script text are coloured. The script editor "knows" about existing objects, built-in variables and functions, etc. and colour codes them accordingly. colour-coding helps a lot in
avoiding mistakes, in particular, you see immediately if you have misspelled some name or use a keyword as a variable, or have a syntax error. However, if you don't like the colour coding, in the
Preferences you can switch it on and off (you can also use F10) as well as customise the colours that are used.
Search, Find And Replace
When working with code, it is common that you will want to find some piece you have written in a large section and then replace it something different, or simply see at a glance where a line of code lies within the
function. To this end, the GameMaker: Studio script editor has a search, find and replace function that can be accessed by pressing the Search button in the toolbar. This will open up a panel on the right of
the code window which looks as follows:
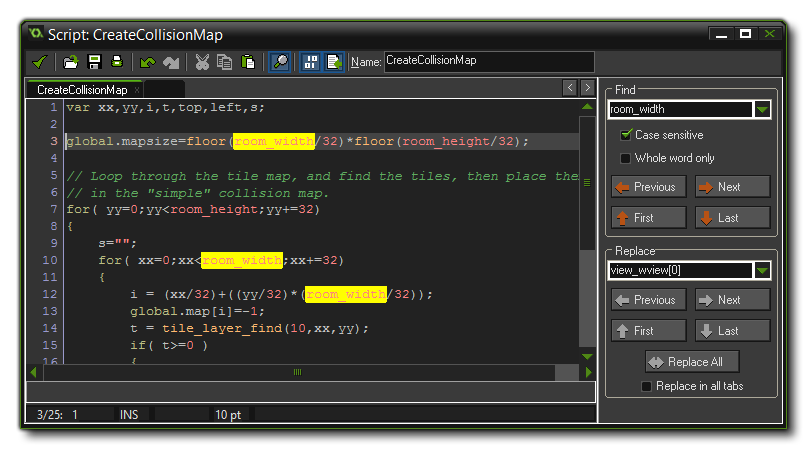 You can type the find string at the top (note that in the code all occurrences of the find string are immediately shown with a yellow background), and you can indicate whether the search must be case sensitive,
which is normally what you want as variable and function names in GML are also case sensitive, and whether you want to only search for whole words. Note that the editor remembers your most recent searches,
and you can click on the drop down button to call them up and re-select them. With the buttons underneath the search string input you can now move to the previous, next, first, and last occurrence of the find string,
and this string will be selected in the text so that you can edit it.
You can type the find string at the top (note that in the code all occurrences of the find string are immediately shown with a yellow background), and you can indicate whether the search must be case sensitive,
which is normally what you want as variable and function names in GML are also case sensitive, and whether you want to only search for whole words. Note that the editor remembers your most recent searches,
and you can click on the drop down button to call them up and re-select them. With the buttons underneath the search string input you can now move to the previous, next, first, and last occurrence of the find string,
and this string will be selected in the text so that you can edit it.
You can also use this panel to replace anything that you have previously searched for by simply typing in the new code that is to be used and pressing one of the buttons that are highlighted underneath. Now you
can use the buttons to replace the previously selected, the next one to be selected, the first, the last or all occurrences of the code searched for. Note that since your scripts can be spread over multiple tabs in the
same category, you are also provided with a Replace in all tabs option which, when checked, will use the search and replace terms to parse all the scripts in all tabs for that category, rather only the one
currently selected.
Bookmarks
The script editor permits you to bookmark a script so that you can open it directly from the IDE using a key combination rather than having to click through multiple windows and icons. This is a very handy way to
track script changes while testing your game, and is activated simply by moving the cursor to the line of the script you want to bookmark and the holding <Shift> + <Control> + <NUM>,
where <NUM> is a number from 1 to 9 on the keyboard. The script editor will now show your bookmark beside the code in the editor.
 To open the bookmarked script again at any time, you should use the keyboard combination <Control> + <NUM>, where <NUM> is the number key of the bookmark.
© Copyright YoYo Games Ltd. 2018 All Rights Reserved


