Creating Extensions
This section details how to create an extension in GameMaker: Studio.
To create an extension (no matter what format file you are using) you must first start by right clicking on the Extension resource in the resource tree and selecting Create Extension
which will open the following window:
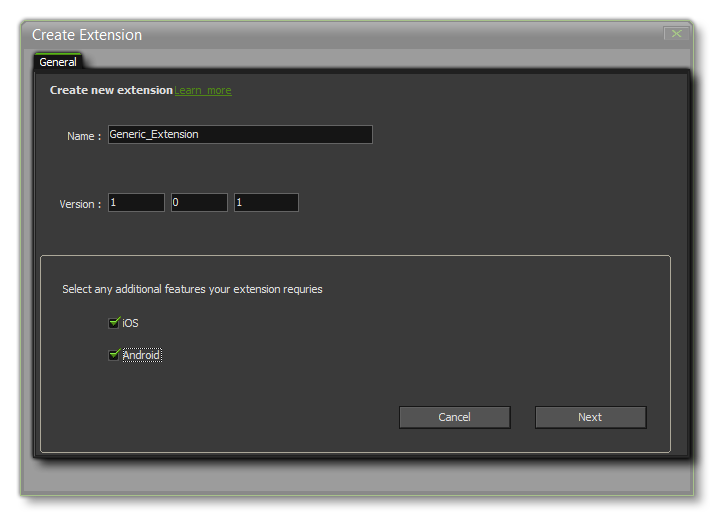 This window is where you place the basic information that is required to create the GMEZ extension package. You can give it a name and a version number, and also supply a Package ID. If you only
wish to use the extension in this one project you can leave the package ID blank, but if you want to export the extension as a GMEZ file, or if you want to upload it to Markeplace, then you will need to give
this information too. The Package ID should be unique to this extension and be in reverse URL format com.<company>.<extension_name>. If your extension package is for iOS or for Android, then you should mark the appropriate check boxes in this window too.
This window is where you place the basic information that is required to create the GMEZ extension package. You can give it a name and a version number, and also supply a Package ID. If you only
wish to use the extension in this one project you can leave the package ID blank, but if you want to export the extension as a GMEZ file, or if you want to upload it to Markeplace, then you will need to give
this information too. The Package ID should be unique to this extension and be in reverse URL format com.<company>.<extension_name>. If your extension package is for iOS or for Android, then you should mark the appropriate check boxes in this window too.
When you are happy that the information is correct you should click the "Next" button to continue. If you have not chosen iOS or Android as part of the extension, your next step will be to flag any of the project
resources as being part of this new extension in the following tab:
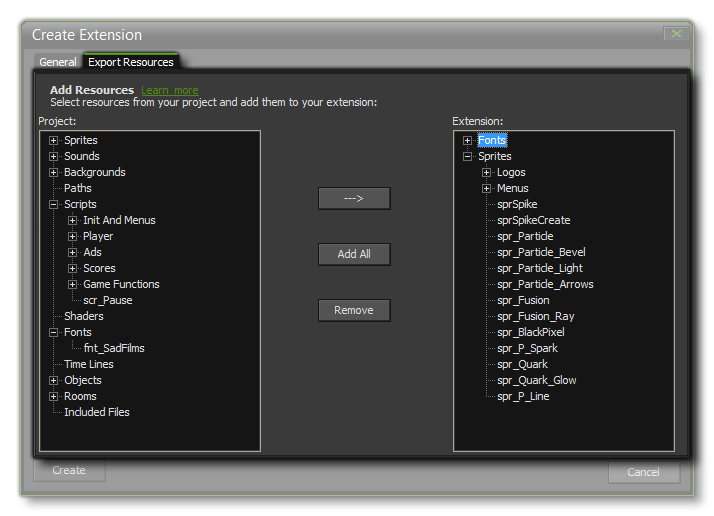 You can select resources to add into the extension package from the left side of the window, and clicking the "---->" button will add them to the resource list on the right. You can select individual assets,
or you can select a group folder from the resources and add that (adding everything it contains). If your GMEZ is to be a template or a framework, you can click the "Add All" button to add everything in the
current project to the extension. If you make a mistake, select the resource or group folder and press "Remove".
You can select resources to add into the extension package from the left side of the window, and clicking the "---->" button will add them to the resource list on the right. You can select individual assets,
or you can select a group folder from the resources and add that (adding everything it contains). If your GMEZ is to be a template or a framework, you can click the "Add All" button to add everything in the
current project to the extension. If you make a mistake, select the resource or group folder and press "Remove".
Once everything is correct you can click Create and your new extension package will be made. You can still edit the package by double clicking on it, or by right-clicking and selecting the
Properties option. This will enable you to edit the extension package properties. If the extension contains resources, you will also see that there is an extra tab available to you for Importing those resources
into the current project:
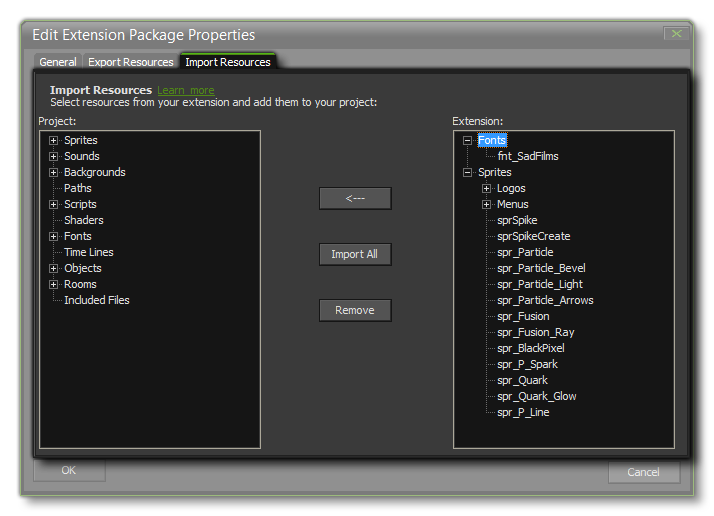 As with exporting resources to an extension, tis tab has various buttons for adding the package resources to your project. the available resources are shown on the right, while the current project resources are shown
on the left. Clicking the <--- button will add the selected resource, or folder of resources, to the project resource tree, or you can click Import All to add everything from the package. If you make
a mistake while adding resources, you can select them from the resource tree on the left and click Remove to remove them again.
As with exporting resources to an extension, tis tab has various buttons for adding the package resources to your project. the available resources are shown on the right, while the current project resources are shown
on the left. Clicking the <--- button will add the selected resource, or folder of resources, to the project resource tree, or you can click Import All to add everything from the package. If you make
a mistake while adding resources, you can select them from the resource tree on the left and click Remove to remove them again.
Android and iOS
When you create your extension package for iOS or Android, there are a couple of extra steps required by you to create the final extension package. These are detailed in the following pages of the manual:
- iOS Extensions
- Android Extensions
Adding Files
Once your basic extension package has been created, you can then go ahead and add files, functions and constants to make it work. This is done by right clicking on the extension and selecting Add File. The
choice of file greatly influences how GameMaker: Studio will use the extension as different file types are required for the different target platforms that can be used when you compile your game, and not all
platforms require a "real" file either (in which case you would use the Add Placeholder option instead of Add File). The relevant files needed per target are listed below:
- GML: This is an extension made only with the GameMaker Language and is compatible with all platforms.
- .js: This is a JavaScript extension and is only compatible with the JS target modules (HTML5).
- .dll: This a dynamic-link library extension and is only compatible with the Windows and Xbox One targets (each target will need a different *.dll file compatible with its specifications).
- .so: This is the Linux equivalent of a DLL and is only compatible with the Ubuntu (Linux) target.
- .prx: This is a file for adding functionality to the PS3 and PS4 targets (each target will need a different *.prx file compatible with its specifications).
- .suprx: This is for adding functionality to the PSVita target.
- .dylib: This is the Mac equivalent of a DLL and is only compatible with Mac target (not iOS).
- placeholder: This is a file that can be of any type, except those given above and .gmez, and will not be used except as a "linker" file to connect a set of functions or constants with the given
extension (generally only for use with iOS and Android extensions).
If the extension package is for iOS or Android platforms, you will also see some extra options for adding files to the package. These are explained in the pages linked to above for those platforms.
File Properties
As you can see, not all extensions are compatible with all target platforms, so you should first open up the extensions resource tree and select for each of the installed extensions a target from their
Extension File Properties. This can be achieved by double clicking on the extension file (NOT the package itself), or by right clicking and selecting "Extension Properties" from the pop up
menu. Either action will open up the following window:
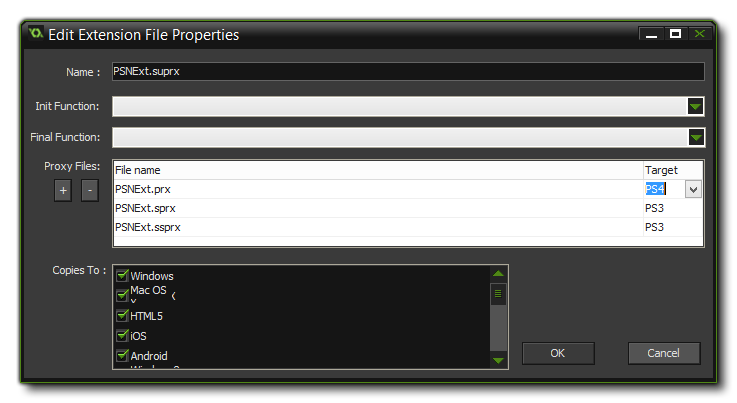 In this window you can re-name the file that is to be used as the extension (this file is then saved with the gmx project and any changes should be made in the project file, and not to the
original) and you can define the Init Function and the Final Function. These functions are the ones that the included file or the source file (which will depend on the target platform) needs to
have called to set them up for use with GameMaker: Studio and to free them again when the game closes. They are called automatically, with no arguments, and you should note that these are not
always necessary so you should check the documentation for the file you wish to use as an extension first to see if these functions are necessary or can be left blank (if in doubt, leave them blank).
In this window you can re-name the file that is to be used as the extension (this file is then saved with the gmx project and any changes should be made in the project file, and not to the
original) and you can define the Init Function and the Final Function. These functions are the ones that the included file or the source file (which will depend on the target platform) needs to
have called to set them up for use with GameMaker: Studio and to free them again when the game closes. They are called automatically, with no arguments, and you should note that these are not
always necessary so you should check the documentation for the file you wish to use as an extension first to see if these functions are necessary or can be left blank (if in doubt, leave them blank).
If you are developing for multiple platforms and wish the same extension to be used on all of them, you can create Proxy Files for each target and add them to your extension too. Simply place
the proxy file in the same folder as the extension (you can find this by right-clicking on the extension and selecting "Open in Explorer". Note that the naming of these files is very important
and you can find a full list of the available platforms and conventions from the following page:
- Proxy Files
The final section is labelled Copies To. Here you can see a list of target platforms which you can tick (or un-tick) as appropriate for your extension. In this way, you can have (for example)
two hi-score extensions, one *.dll and one *.js that have the same functionality but work for different target platforms. You would tick ONLY the Windows check-box for the *.dll and ONLY the HTML5
check-box for the *.js and then GameMaker will know to use only the appropriate one for the target platform. You can also set up different configurations and tick/un-tick options as
necessary depending on the current configuration chosen (for more information see Advanced Use: Configurations). Note that adding proxy files will automatically
tick the appropriate target platform.
Adding Functions and Constants
Now you have added the necessary files to the extension, it is time for you to add the functions and constants that you wish the extension to use. This is done by right-clicking on the file and selecting either
Add Function or Add Constant. For a constant, it is simply a case of giving it a name (only letters from A-Z, numbers and the under-bar "_" symbol are permitted, and the name must not
start with a number) and a value and then clicking on the "Okay" button. If you choose to add a function, then the following window will open:
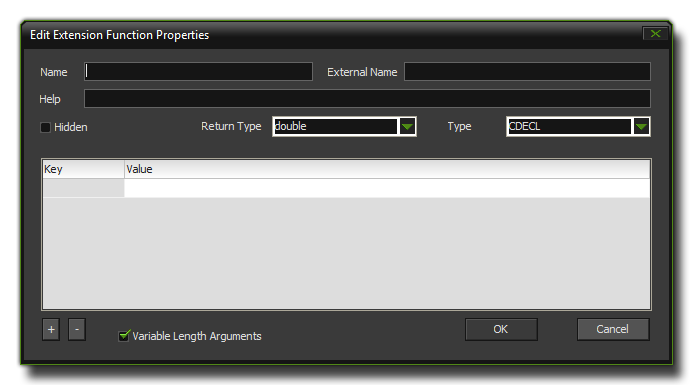 The different options presented here are:
- Name - This is the GML name of the function (only letters from A-Z, numbers and the under-bar "_" symbol are permitted, and the name must not start with a number).
- External Name - Here you must put the name of the original function as it is recognised by the extension, even if the Name is the same.
- Help - This is the text that will appear at the bottom of the script editor and should be a correct form of the function syntax with the format function(argument0,argument1).
- Return Type - What the function returns. This can be either a string (text) or a double (real number).
- Type (dll only) - The calling convention used to call the function.
- Arguments - Here you can list all the arguments that your function can take as well as the type (string or double). This is limited to a maximum of sixteen arguments, and note that for functions
with 4 or more arguments, all of them must be of type double.
Once you have defined all your constants and functions, the extension is almost ready to be used and distributed as a *.gmez. To create a *.gmez, simply right-click on the extension name and select Export, which will open a save dialogue where you can say where to save the final *.gmez file to. Once this is done you can then use the same GMEZ file in other projects, or distribute it for others to use.
NOTE: A saved *.gmez does not save the configuration options, and those will have to be set whenever you load a created gmez into a new project.
Additional Documentation
You can find additional documentation on extension packages from the YoYo Games Knowledge Base:
- Extensions
You can also find additional information about the GameMaker: Studio Marketplace from the following section of the Knowledge Base:
- Marketplace FAQs
© Copyright YoYo Games Ltd. 2018 All Rights Reserved