The image file to be loaded should always be in *.png format and all images that are to be turned into animated sprites should have a "strip" format (see the image below). They will be split into the number of sub-images specified following the rule sprite width = strip width / sub images.
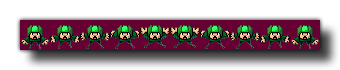 As you can see in the above image, the sprite has been placed on a dark purple background, and this can be removed by setting the "removeback" argument to true. This works by checking the
bottom left pixel of the sprite for the colour there and then uses that as the colour to be removed. For example, in the above image, if we had the bottom left pixel colour as green, all the green parts
of the sprite would have been removed and the rest of the purple background ignored.
As you can see in the above image, the sprite has been placed on a dark purple background, and this can be removed by setting the "removeback" argument to true. This works by checking the
bottom left pixel of the sprite for the colour there and then uses that as the colour to be removed. For example, in the above image, if we had the bottom left pixel colour as green, all the green parts
of the sprite would have been removed and the rest of the purple background ignored.
If you choose the "removeback" option, you may also want GameMaker: Studio to smooth the edges of the sprite by setting the "smooth" argument to true. All this does is create a semi-transparent border around the edges of the sprite after it has had its background removed.
Finally you can also specify the x and y origin for the sprite. This is the point where the sprite is "fixed" onto the instance that uses it, and is always calculated as relative to the 0,0 top left corner of one sprite sub-image. So, for example, a sprite that is 32 x 32 pixels with these values set to (16,16) will have its origin in the center.
By default all new sprites have their bounding boxes calculated automatically (the exact bbox will depend on the size and transparency of the sprite), however you may wish to customise this, in which case you should also use the function sprite_collision_mask.
NOTE: Depending on the target platform that is chosen you are limited as to where you can save and load files from. See Reference - Files for more information.
NOTE: You should be aware that if you are using this function in your HTML5 target game to load resources from an external server, then, due to XSS protection in browsers, attempts to load resources from across domains can be blocked and may appear to return blank results.